Transporting a kayak can seem like a daunting task, especially for new paddlers. J-racks, named for their shape resembling the letter ‘J’, are one of the most popular types of carriers for kayaks due to their simplicity and effectiveness. This article provides a comprehensive guide on how to tie down a kayak on a J-rack.
Step-by-Step Guide: How to Tie Down a Kayak on a J-Rack

1. Equipment You’ll Need
- Kayak J-Rack: Ensure it’s compatible with your vehicle’s roof rack.
- Kayak straps: Usually two, each about 12-15 feet long.
- Bow and stern lines: To secure the front and rear of the kayak.
- Foam or rubber padding: To prevent damage to your kayak.
2. Preparation Steps Before Tying Down the Kayak
Position the J-Racks on the Vehicle:
- Spacing: Ensure the J-racks are spaced out evenly on the roof rack. They should be aligned with the bulkheads or the strongest part of the kayak.
- Orientation: Position the J part of the rack facing outwards. This is where your kayak will rest.
Inspect the Kayak Straps:
Ensure there are no frays or signs of wear. Replace damaged straps immediately, as they can jeopardize the security of your kayak.
3. Positioning the Kayak
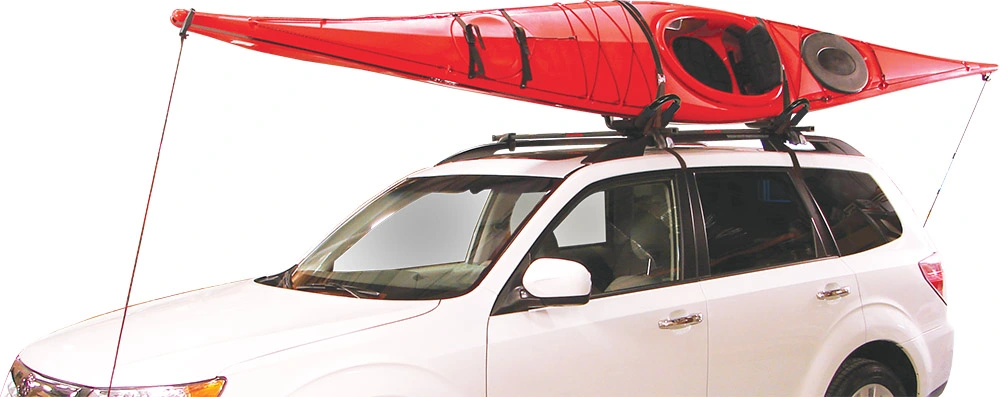
- Lift the Kayak: With the help of a friend, lift the kayak and position it so the cockpit faces out and rests on the J-rack. The bottom of the kayak should be against the car while the top rests on the J-rack.
- Align Properly: Ensure the kayak is centered between the two J-racks and isn’t leaning too far forward or backward.
4. Tying Down the Kayak
Use the Kayak Straps:
- Loop Around: Start by taking one end of the strap and loop it under the roof rack bar on the opposite side of the car.
- Over the Kayak: Bring the strap over the kayak’s hull, ensuring it’s tight.
- Under the Rack: Loop the strap under the roof rack bar on the same side of the car.
- Secure: Buckle or tie the two ends of the strap together, ensuring they are tight and the kayak is secured.
Repeat:
Do the same for the other J-rack.
5. Securing the Bow and Stern
For added security, especially on long drives or highways:
- Front: Attach one end of the bow line to the front handle or towing eye of your kayak. The other end should be attached to a secure point on the front of your car, often a dedicated towing eye.
- Rear: Similarly, attach the stern line to the rear handle or towing eye of the kayak and the other end to a secure point at the back of your car.
6. Final Check
- Tug Test: Give your kayak a gentle tug. It shouldn’t move side to side or front to back.
- Check Straps: Ensure that all the straps are tight and the buckles are secured.
- Avoid Obstructions: Ensure that the kayak doesn’t obstruct your vehicle’s lights, number plates, or view through any mirrors.
Conclusion
Tying down a kayak on a J-rack may seem complex at first, but with practice, it becomes a swift and easy task. Furthermore, always prioritize safety and ensure that your kayak is securely tied to prevent any accidents or damage during transport. Happy paddling!
Read more about kayaks:
- What to Wear for Kayaking in Summer
- How to Store a Kayak in the Garage
- What is a Skeg on a Kayak
- What is a Tandem Kayak
- How to Build a Homemade Kayak Launch
- How to Get in a Kayak
- What to Wear for Kayaking?
- How to Transport a Kayak Without a Roof Rack?
- How to Build a Kayak Rack for an RV?
- Are Inflatable Kayaks Safe?
- How to Build a Rack for Kayaks?
- Do Kayaks Have a Weight Limit?
- Wilderness Systems Pungo 120 Kayak Review
- Is it hard to kayak?
- How to Lock a Kayak?
- Where to Kayak with Manatees?
- Pungo 120 vs 125: Which is the Better Choice?

Hi, I’m Steve, the passionate kayaking enthusiast behind Outdoor Bravo. As an avid adventurer and nature lover, kayaking has been a central part of my life for as long as I can remember. My love affair with the water began during my childhood, and it has only grown stronger over the years. From serene lakes to rushing rivers and even challenging ocean tides, I’ve navigated various water bodies, seeking new thrills and unforgettable experiences.